| How to Plot Old Surveys | ||||||||||
|
by Debbie Robison June 3, 2007 | ||||||||||
| DISTANCE MEASUREMENT |
| 18th- century and many 19th-century
surveys were written using a different form of measurement than the feet and
inches we use today. Early surveyors measured distance with a 66-foot chain
composed of 100 links. This distance was too cumbersome in Distance Conversions 1 chain = 4 poles = 66 feet 1 pole = 16 ½ feet 1 link = 7.92 inches AREA CALCULATION |
| Surveyors calculated the area within the survey boundary, and typically wrote the area on the survey within the parcel boundary. The most common unit of area measurement was the acre; however, some surveyors were more precise and specified the number of acres, roods, and poles. (Abbreviated A, R, P) Once again, the terms pole, rod, and perch are synonymous, even as pertains to units of area measurement. Area Conversions 1 acre = 160 square rods = 43, 560 square feet 1 rood = ¼ acre 1 pole = 30 ½ square yards METES AND BOUNDS |
| Surveys specified the direction of a boundary line first, then the distance to the next line, where a point of reference was noted. Note the following example: Beginning at a hickory tree, thence No 32d Et 25 poles to an oak tree marked DR, thence No 65d Et 16 poles 5 links to a pile of stones, thence (May also be written: Beginning at a hickory tree, thence N32E 25p to an oak tree marked DR, thence N65E 16p, 5l to a pile of stones, thence ) In this example, the surveyor stood at the hickory tree with his compass, and headed in the specified northeasterly direction for 412 ½ feet (25 poles x 16.5) until he came to the oak tree. He then turned more toward the east and walked for 267 feet and 3.3 inches (16 poles x 16.5) + (5 links x 7.92) = 264 + 39.6 = 267-3.3 PLOTTING A SURVEY |
| To plot a survey without a computer program; graph paper, a protractor, and a ruler (or scale) are helpful. Using graph paper allows you to estimate the area by counting squares. Choose a scale you want to use in plotting your survey; for example, 1 inch on paper equals 50 feet on the ground. Make a list of the metes and bounds (direction and distance), and convert the distances into units of feet and inches. If you are using a scale of 1= 50, divide the distances by 50, so youll know how many inches you need to draw on the paper. In the following example, the surveyor specified N30E, i.e. face north and turn 30 degrees toward the east. The red line in the following image is plotted with a direction of N30E. 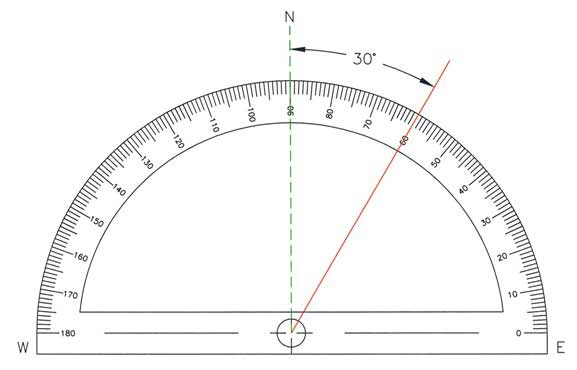
In the next example, the surveyor specified N60W, i.e. face north and turn 60 degrees toward the west. The red line in the following image is plotted with a direction of N60W. 
The first direction will always be either north or south. In the following example, the surveyor specified S25E, i.e. face south and turn 25 degrees toward the east. The red line in the following image is plotted with a direction of S25E. 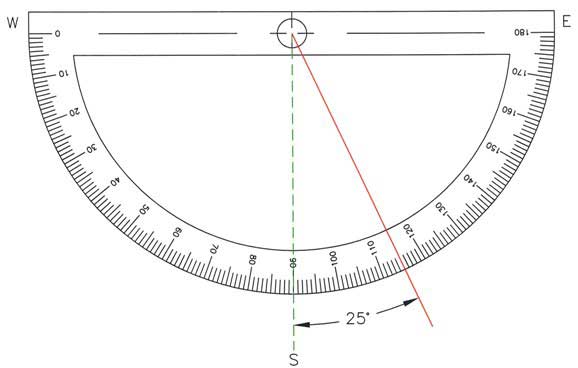
The second direction, after the degrees, will always be east or west. In the following example, the surveyor specified S78W, i.e. face south and turn 78 degrees toward the west. The red line in the following image is plotted with a direction of S78W. 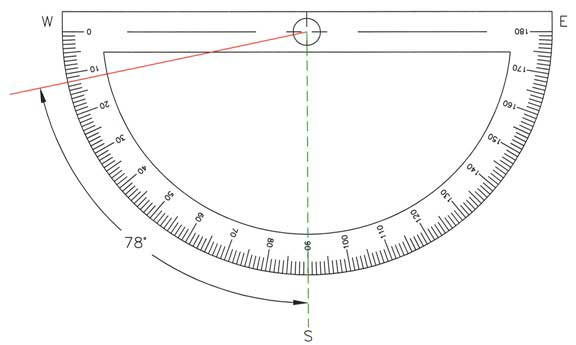
Plot your survey by drawing a line in the direction specified for the distance provided (adjusted for the 1=50 scale). Begin your next line at the end of the previous line. Your goal is to come full circle. If the end of your last line does not come close to the beginning line of your survey, double-check your plot. PRECISION |
| Generally speaking, the earlier the survey, the less precise the metes and bounds. Some early grant surveys didnt provide the degrees, and only specified, for example, NE (northeast). Links were typically not used as a unit of measurement in the early surveys. Later, more precision was added. The direction included degrees, minutes, and seconds. For example, N 35d 20 45 E translates to north 35 degrees, 20 minutes, 45 seconds east. There are 60 minutes in every degree, and 60 seconds in every minute. S 50d 30 W is the same as south 50 ½ degrees west. |
